SonarQube는 우연히 알게된 Tool로 코드 품질 관리 툴이다.
회사에서 개인적으로 사용하고 있다.
젠킨스 등의 CI 툴과도 연계(https://www.sonarqube.org/features/integration/)가 가능하여 잘 사용하면 파워풀하게 사용할 수도 있다.
개인적인 사용을 위해서는 별로 세팅할 것도 없이 그냥 사용하면 된다.
SonarQube Download & Run
SonarQube의 홈페이지 (https://www.sonarqube.org)에서 Download만 하면 별도의 설치 없이 실행이 가능하다.
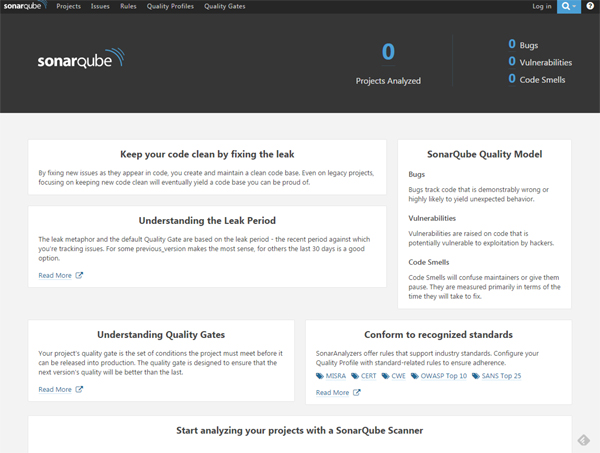
압축을 푼 후 ...\sonarqube-6.2\bin\windows-x86-64 아래의 StartSonar.bat 파일을 실행하면 웹 서버가 실행되며 브라우저를 통해 localhost:9000 으로 접속하면 아래와 같은 화면을 볼 수 있다.
SonarQube Scanner Download
소스를 연동시켜서 확인하기 위해서는 SonarQube Scanner(https://docs.sonarqube.org/display/SCAN/Analyzing+Source+Code)를 사용해야 한다.
Download 받은 후 압축을 풀고 bin 폴더를 환경 변수에 추가하여 편하게 사용하자.
소스 연동
환경설정 파일 생성
Project에 대한 환경설정 파일을 생성하여야 한다.
Analyzing with SonarQube Scanner Page를 참고하여 sonar-project.properties 파일을 생성하여 소스의 root 폴더에 저장한다.
|
|
Scan !
Windows의 Command window를 이용하여 소스가 있는 폴더로 이동하자.
아래 명령어로 소스를 Scan 한다.
|
|
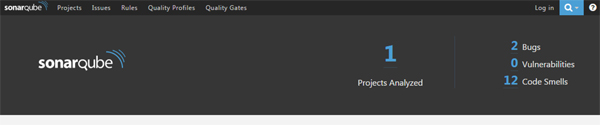
다음과 같이 scan이 성공하면 브라우저에서 localhost:9000으로 다시 접속하자. 그러면 프로젝트가 추가된 것을 볼 수 있다.

사용한 소스는 아래와 같다.
|
|
확인
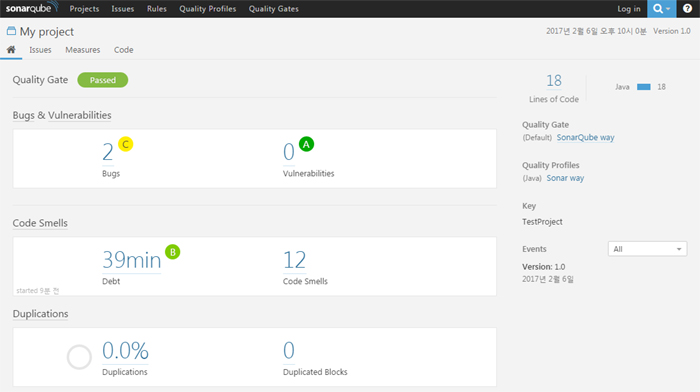
Projects 메뉴에서 위에서 생성한 My Project 를 선택하여 들어가면 아래와 같은 화면을 볼 수 있다.
소스에 존재하는 Bug, Vulnerability, Code Smell, 이를 수정하기 위해 필요한 예상 시간인 Debt, Duplicated code 등의 현황을 볼 수 있다.
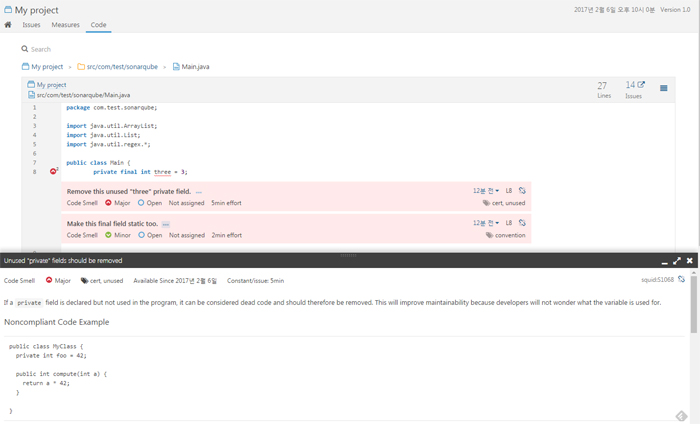
사용하기 나름이지만, 나는 code 메뉴를 통해 파일 별로 보는 것을 선호한다.
문제가 되는 라인마다 folding 버튼이 나타나고, 클릭하면 무엇이 문제인지 보여준다.
여기서 ... 버튼을 누르면 아래쪽에 해결책까지 보여준다.